
Deploying EKS Anywhere on simulated bare metal (VMs) with KVM + VBMC
Fake it till you make it #2: a real EKS Anywhere cluster on KVM virtual machines with fake IPMI.
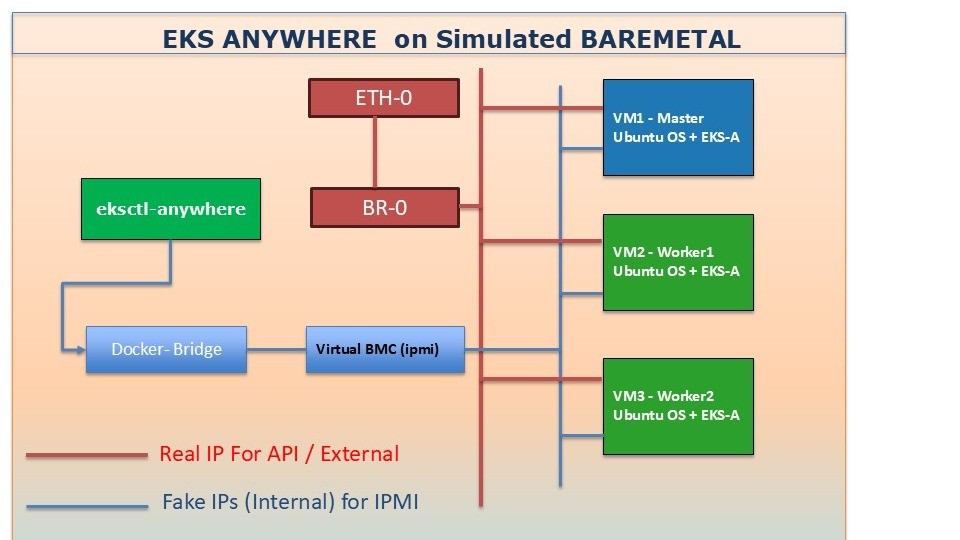
In my last post I showed how to use VirtualBMC to simulate IPMI for KVM VMs, essentially making them look like bare-metal machines.
Now let's take it a step further: we'll deploy an EKS Anywhere cluster on these fake bare-metal VMs. This setup is very useful for testing without actual hardware.
Source: EKS Anywhere bare-metal getting started.
1. Prepare the environment
Use a bare-metal machine or one that supports nested KVM. I assume libvirt, VBMC, Docker and the usual tools are installed. Now install the eksctl tools:
# Docker without sudo
sudo usermod -aG docker $USER

# eksctl (EKS CLI)
curl -sLO "https://github.com/eksctl-io/eksctl/releases/latest/download/eksctl_$(uname -s)_amd64.tar.gz"
tar -xzf eksctl_$(uname -s)_amd64.tar.gz -C /usr/local/bin/

# eksctl anywhere
RELEASE_VERSION=$(curl https://anywhere-assets.eks.amazonaws.com/releases/eks-a/manifest.yaml --silent --location | yq ".spec.latestVersion")
EKS_ANYWHERE_TARBALL_URL=$(curl https://anywhere-assets.eks.amazonaws.com/releases/eks-a/manifest.yaml --silent --location | yq ".spec.releases[] | select(.version==\"$RELEASE_VERSION\").eksABinary.$(uname -s | tr A-Z a-z).uri")
curl $EKS_ANYWHERE_TARBALL_URL \
    --silent --location \
    | tar xz ./eksctl-anywhere
sudo install -m 0755 ./eksctl-anywhere /usr/local/bin/eksctl-anywhere
2. Create an Ubuntu EKS-A image
Follow the EKS Anywhere artifacts guide. This walkthrough uses Ubuntu on bare metal.
3. Create three VMs with a script
Use virt-install in a loop: one control-plane node and two workers.
#!/bin/bash
NODES=(
  "master d1"
  "worker1 d2"
  "worker2 d3"
)

for node in "${NODES[@]}"; do
  set -- $node
  NAME=$1
  MAC="54:52:00:aa:bb:$2"

  echo ">>> Creating VM: $NAME"

  virt-install \
    --name "$NAME" \
    --memory 12096 \
    --vcpus 8 \
    --cpu host \
    --os-variant ubuntu22.04 \
    --boot loader=/usr/share/OVMF/OVMF_CODE.fd,loader.readonly=yes,loader.type=pflash,nvram.template=/usr/share/OVMF/OVMF_VARS.fd \
    --disk path=/var/lib/libvirt/images/${NAME}.qcow2,size=100,bus=sata \
    --disk device=cdrom \
    --network bridge=br0,model=virtio,mac=$MAC \
    --noautoconsole
done
The VMs boot with OVMF (UEFI firmware) instead of legacy BIOS (SeaBIOS). Don't skip this.
4. Add fake IPMI with VirtualBMC (a hack)
Here's a little hack: IPMI uses port 623 by default. I connected all the VMs to IPMI through the Docker bridge, by adding one IP per VM on the bridge interface. Do not change the port number.
sudo ip addr add 172.17.0.100/16 dev docker0
sudo ip addr add 172.17.0.101/16 dev docker0
sudo ip addr add 172.17.0.102/16 dev docker0

vbmc add master  --address 172.17.0.100 --port 623 --username admin --password password --libvirt-uri qemu:///system
vbmc start master
vbmc add worker1 --address 172.17.0.101 --port 623 --username admin --password password --libvirt-uri qemu:///system
vbmc start worker1
vbmc add worker2 --address 172.17.0.102 --port 623 --username admin --password password --libvirt-uri qemu:///system
vbmc start worker2

vbmc list
+-------------+---------+--------------+------+
| Domain name | Status  | Address      | Port |
+-------------+---------+--------------+------+
| master      | running | 172.17.0.100 |  623 |
| worker1     | running | 172.17.0.101 |  623 |
| worker2     | running | 172.17.0.102 |  623 |
+-------------+---------+--------------+------+
5. Prepare hardware.csv
hostname,bmc_ip,bmc_username,bmc_password,mac,ip_address,netmask,gateway,nameservers,labels,disk
master,172.17.0.100,admin,password,54:52:00:aa:bb:d1,192.168.100.10,255.255.255.0,192.168.0.1,8.8.8.8,node=cp,/dev/sda
worker1,172.17.0.101,admin,password,54:52:00:aa:bb:d2,192.168.100.11,255.255.255.0,192.168.0.1,8.8.8.8,node=cp,/dev/sda
worker2,172.17.0.102,admin,password,54:52:00:aa:bb:d3,192.168.100.12,255.255.255.0,192.168.0.1,8.8.8.8,node=cp,/dev/sda
6. EKS Anywhere cluster config (cluster.yaml)
export CLUSTER_NAME=eks-anywhere-on-vms
eksctl anywhere generate clusterconfig $CLUSTER_NAME --provider tinkerbell > $CLUSTER_NAME.yaml
This generates a basic cluster.yaml template. Before deploying, update a few key fields:
- host: a free IP for the control-plane endpoint.
- tinkerbellIP: another free IP.
- osImageURL: a web server address hosting the Ubuntu image from step 2.
- hardwareSelector: match the labels in your hardware.csv.
- kubernetesVersion: the version you want (for example 1.30 or 1.33).
- sshAuthorizedKeys: generate an SSH key pair, put the public key here and keep the private key safe for connecting to the VMs later.
7. Deploy: turning fake bare metal into a real cluster
eksctl anywhere create cluster -f $CLUSTER_NAME.yaml --hardware-csv hardware.csv
Deployment time: depending on your hardware, the full cluster setup takes about 5–15 minutes. You can follow the progress live in virt-manager: the control-plane node comes up first, followed by the workers one after another.
Grab a coffee while your cluster builds itself.
export KUBECONFIG=${CLUSTER_NAME}/${CLUSTER_NAME}-eks-a-cluster.kubeconfig

kubectl get no
NAME      STATUS   ROLES           AGE     VERSION
master    Ready    control-plane   9m2s    v1.32.4-eks-xxxxd4
worker1   Ready    <none>          4m52s   v1.32.4-eks-xxxxd4
worker2   Ready    <none>          5m16s   v1.32.4-eks-xxxxd4
Conclusion
Thank you for reading! Give deploying an EKS Anywhere cluster on KVM VMs with VBMC a try: it's a great way to experiment with bare-metal Kubernetes in a virtual environment.
Known issue: after the OS image is written, a VM may not boot straight from its disk. A quick change in the boot menu fixes it, and this can be automated.
Happy experimenting!